CMS Forced Recording Activation Guide
This guide explains how to manually (forcibly) enable recording for a desired camera in CMS, and how to configure an alarm output on the NVR when a forced recording event occurs.
Overview
- Start/stop forced recording in CMS
- (Optional) Link forced recording events to an alarm on the NVR
1. Starting forced recording in CMS
- Right-click the target camera on the CMS live screen.
- Select Camera > Forced Recording > Start.
- Forced recording starts for the selected camera.
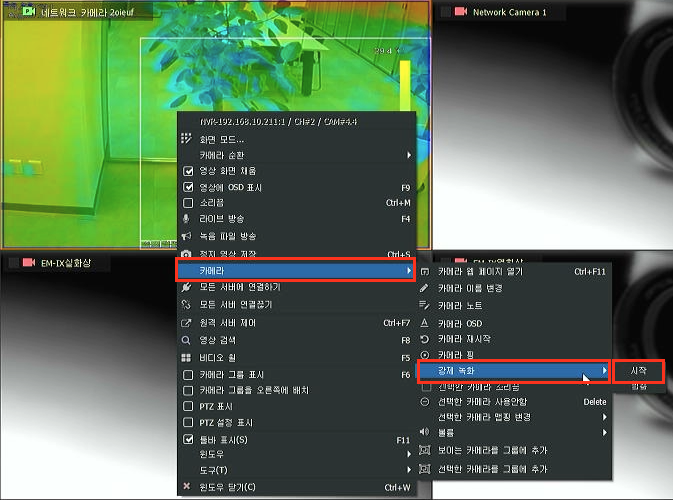
To stop forced recording, select Stop from the same menu.
2. (Optional) Setting up an alarm for forced recording events on the NVR
This step is not required — configure it only if you need an alarm output when forced recording occurs.
The NVR can treat a forced recording as an event and trigger an alarm output.
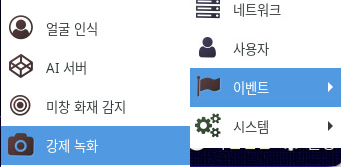
- On the NVR, go to
Settings > Event > Forced Recording. - In the Forced Recording window, select the target camera using the checkbox.
- Click the Event Mapping... button to link an action (such as an alarm) to be performed when forced recording occurs.
- The Event Mapping window works the same way as the Event Mapping window in the DI signal guide. (Select a row → Add... → Select an action → OK)
- Click OK to save.
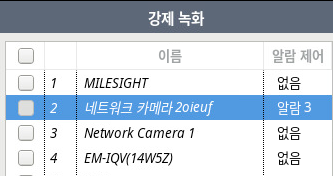
- You can check the alarm-linking status per camera in the Alarm Control column of the list. (Default: none)
3. Verifying operation
- Start forced recording in CMS.
- Check that the alarm (e.g., DOUT) configured on the NVR is triggered.
- Use the search function to verify the recorded data for the forced recording period.